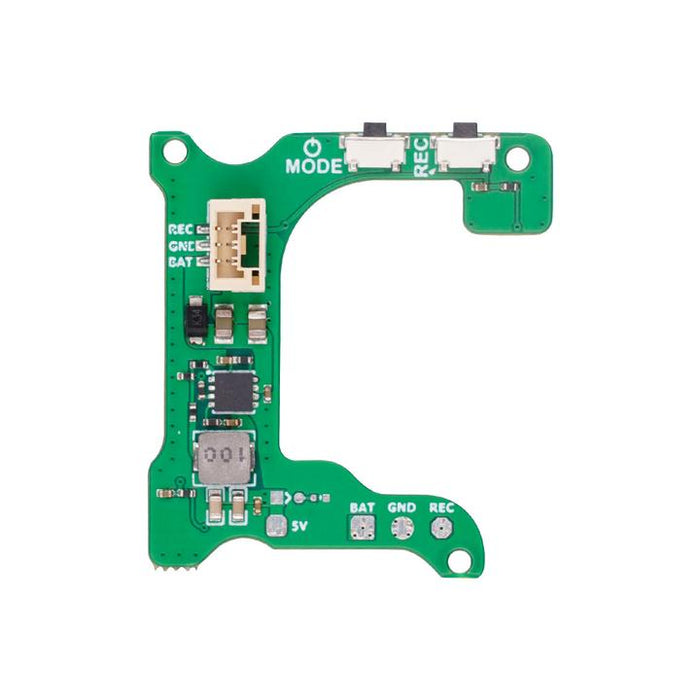
GoPro-BEC board for Gopro Hero 8
Bullet point
- BEC Board is specially designed for Naked GoPro HERO6/7/8 which weighs about 1.5g, makes your naked GoPro lighter and easy to install on your drone.
- The BEC output voltage is 5V@2A, avoid the accident of power of which is caused by the insufficient power supply for the FC board. Also, stock buttons and LEDs are integrated.
- Integrated GoPro stock buttons, Power/Mode Button and Record Button.
- Integrated GoPro stock LED to know the status of the camera.
- The pad is available for pilots to control the GoPro recording via the radio transmitter.
- With the pluggable connector, which is easier to connect with your flight controller for power supply and recording.
Specification
- Item: BEC Board for Naked Camera
- Weight: 1.53g/1.57g
- Output: 5V @ 2A
- Input voltage: 2-4S
- Connector: GH 1.25 3P connector

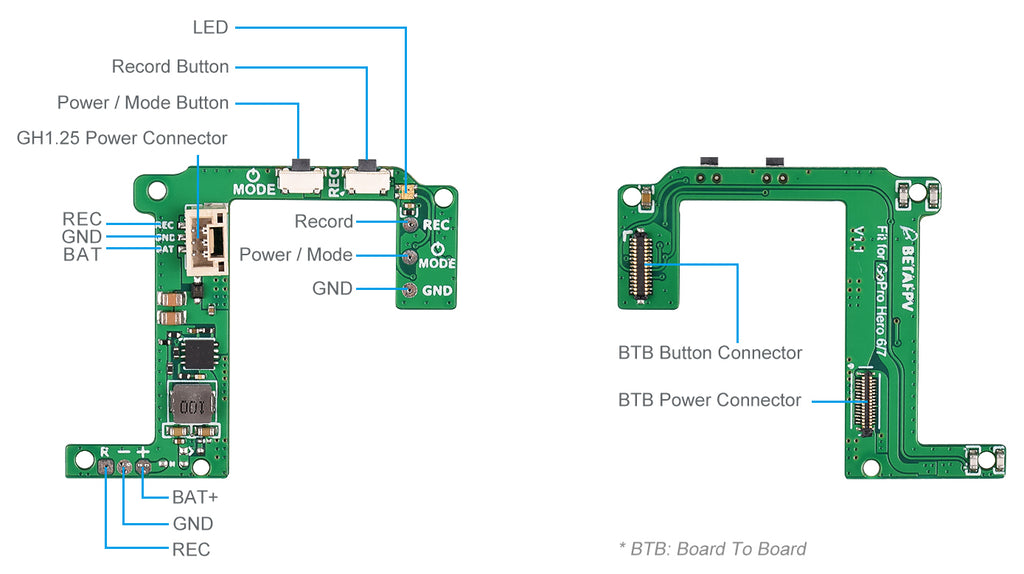
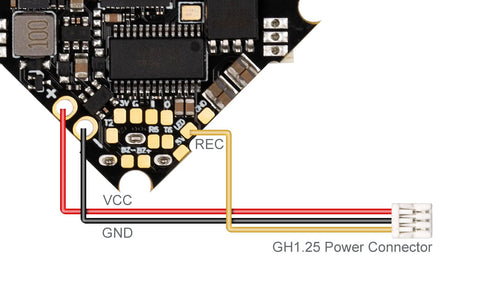
BEC Board Diagram
The two buttons on the BEC board have the same functions as the GoPro spare buttons. Three actions we will use frequently.
- Power on-Press the power/mode button, the LED flashes three times and goes out.
- Start recording-Press the "Record" button once and the LED flashes slowly. If the LED flashes once and goes off, it means there is no SD card.
- Stop recording-Press the "Record" button, the LED stops blinking slowly.
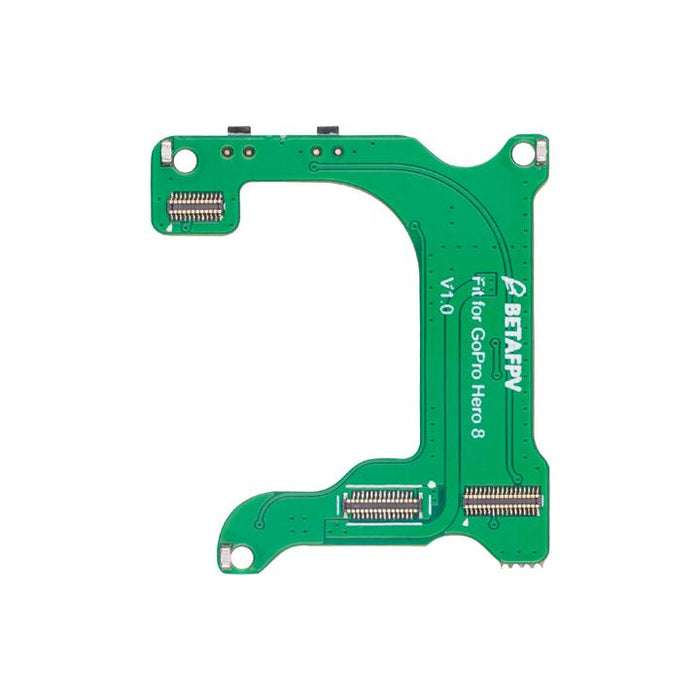
BEC Board for GoPro HERO6/7

LED Status
Under normal operation, plug the GH1.25 connector into the GoPro Lite camera firstly, then connect with the battery. The LED will flash once, then you should press the Power/Mode button once in a second to power on. The LED on the BEC board has the same status as the stock LED on the GoPro mainboard.
Indication |
Button Operation |
LED Status |
Power On |
Press the Power/Mode button once |
Flash 3 times and light off |
Power Off |
Press the Power/Mode button for 5 seconds |
Flash 7 times and light off |
Start Record |
Press the record button once |
Continuously slow flash |
Stop Record |
Press the record button once |
Flash 3 times and light off |
Mode Switch |
Press the Power/Mode button once |
Check the mode on LCD Display |
How to Setup Remote Record
The pilot could use the switch on the radio transmitter to start/stop the record. Some more configuration needed.
For example, if you use F4 FC V2.0 in the drone, like the 95X whoop drone, the connection diagram is shown below. The yellow cable (FC B12 pin pad) is just for the remote record.

We use the Pinio function in Betaflight to control the record. First, setup the Pinio function of the B12 pin in the FC board.
resource FLASH_CS 1 NONE
resource PINIO 1 B12
set pinio_box = 40,255,255,255
save
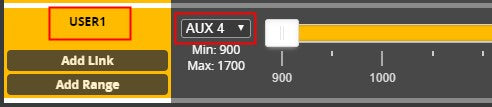
Next, map one of the switch channels in your radio transmitter to this Pinio (aka USER1). As shown below, we map the AUX4 channel in the radio transmitter to USER1 Pinio. The cursor in the orange zone means button released and the white zone means pressed. So keep the cursor in the orange zone in default.
Third, check if the Pinio function works. Change the switch and make the cursor move from the orange zone to the white zone, and finally back to the orange zone. Now you could check the LED status to know if the record starts. Use the same process to stop recording.
If you use the 12A F4 AIO FC board, like the 85X whoop drone, you will use the LED_STRIP pin (aka A08 pin pad) for the Pinio function.
resource LED_STRIP 1 NONE
resource PINIO 1 A08
set pinio_box = 40,255,255,255
save
Know more about the Betaflight Pinio function.
Parts of Naked Camera Series
We know some of the pilots might have a question about how to get the case for the naked camera or some might wanna grab the naked Camera directly. Here we provide some more choices for your better installation.
- Beta95X for Naked Camera
- Beta85X for Naked Camera
- BEC Board for Naked Camera
- Case for Naked Camera
- Customized Naked Camera
How to Disassemble GoPro HERO6/8 Black
Special thanks to JONAH BLAESER who provided the method of disassembling GoPro HERO6/8 Black. If you are interested, please check the link to know the specific steps to make your own naked GoPro.
GoPro HERO6 Black Disassembly Guide
We also provided the method of disassembling GoPro HERO8 Black. If you are interested, please check the link.
GoPro HERO8 Black Disassembly Guide
Note: Do this at your own risk. You will lose your GoPro’s warranty and you may end up bricking the camera if something goes wrong. This guide is not authorized by GoPro and your camera is not guaranteed to work afterward. BETAFPV will not be held responsible for this action.
How to assemble the BEC Board on Naked Camera.

FAQ
- STL file for Naked GoPro HERO8 Case
- STL File for Naked Camera Series (Only suit for HERO6/7)
- How to assemble the case with the Naked Camera
Package
- 1 * BEC Board for GoPro HERO6/7
- 1 * GH1.25 Power Cable (90mm 30AWG)

or
- 1 * BEC Board for GoPro HERO8
- 1 * GH1.25 Power Cable (90mm 30AWG)
- 3 * M1.4*4 Screws
